In the last post, we see the navigation phase. Three processes work together to deliver the document for the next phase.
In this post, we will open the box of the rendering phase and take a look at what is inside.
From document to web page — 8 sub-phases
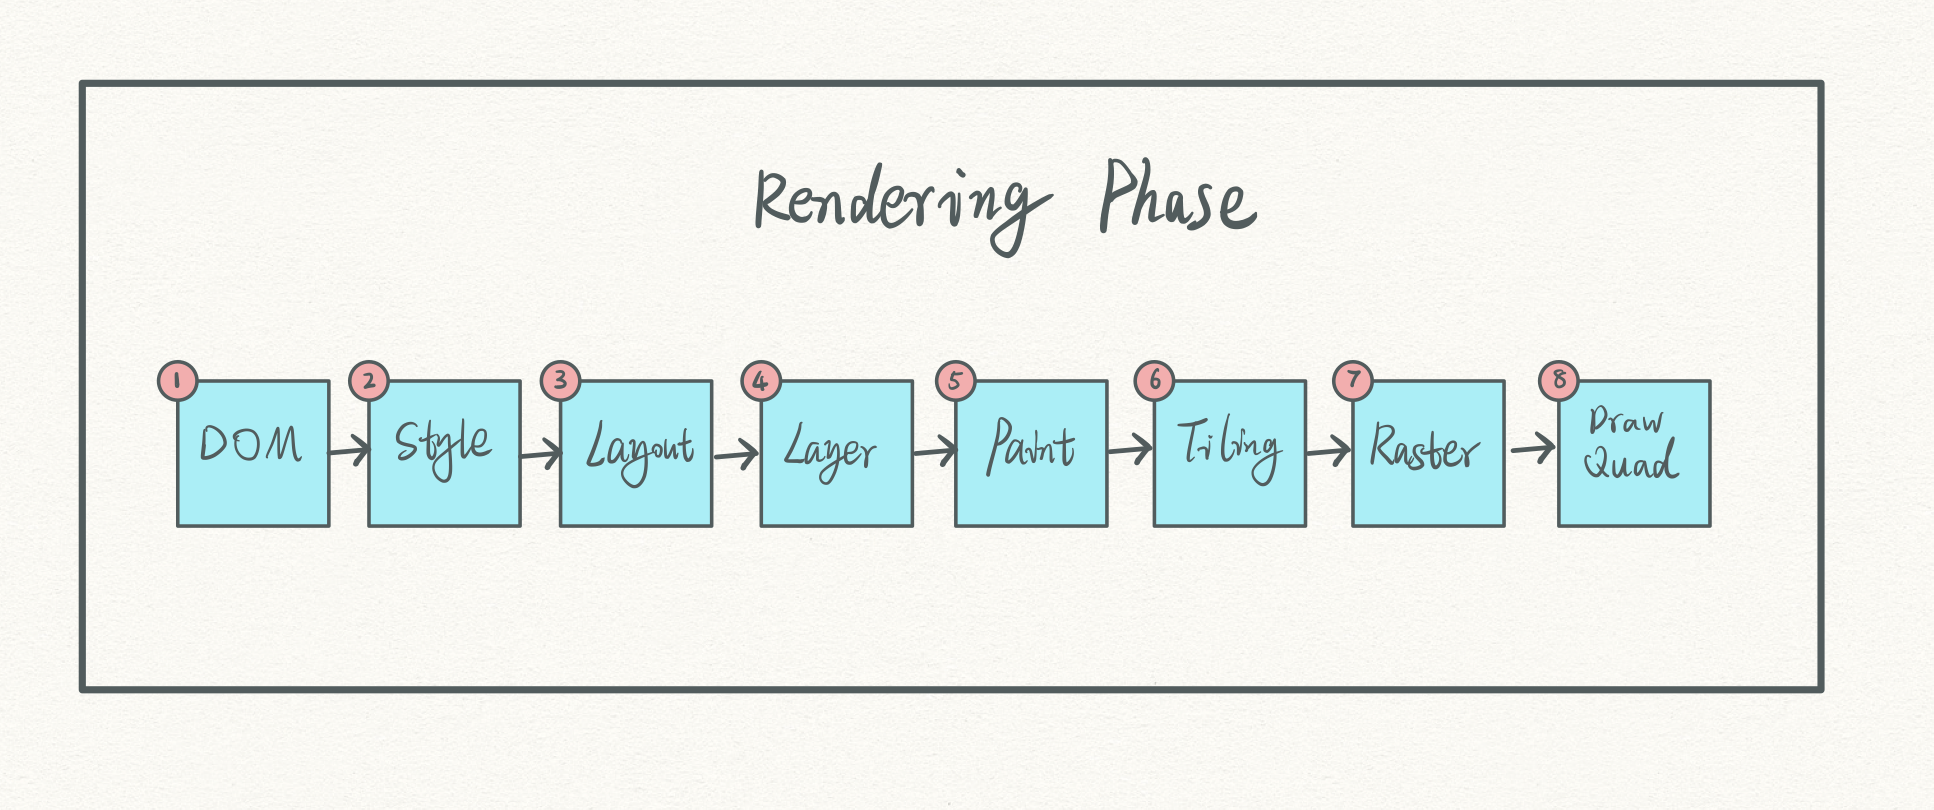
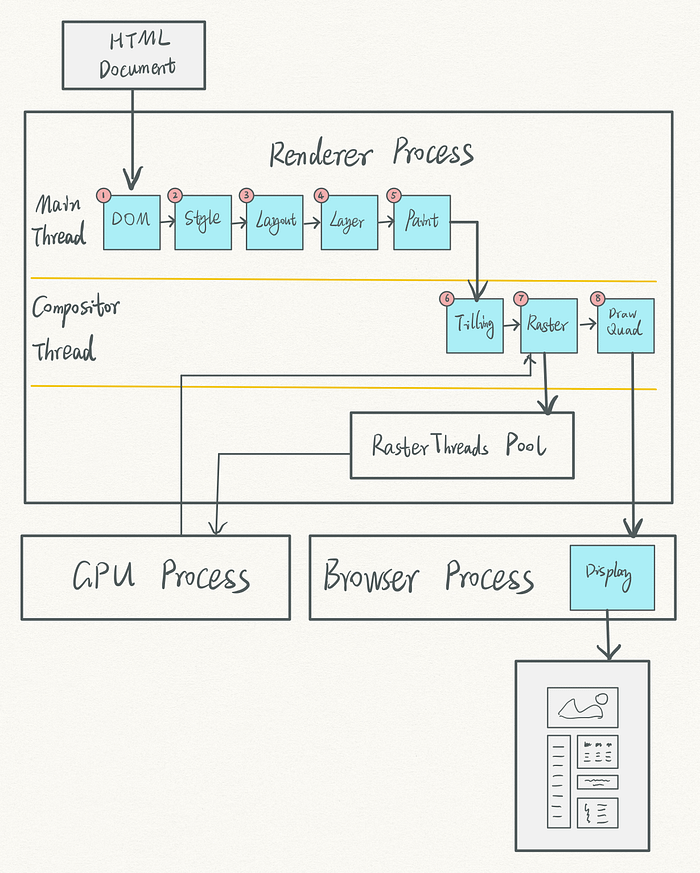
The rendering phase includes 8 sub-phases:
- DOM construction
- Style computation
- Layout
- Layer
- Paint
- Tilling
- Raster
- Draw Quad and display
Two threads in the renderer process are involved in:
- The main thread takes care of the 1–5 phases
- The compositor thread manages the 6–8 phases

Phase 1: DOM construction

The input is an HTML document carried over from the network process, and the output is a DOM tree.
Why DOM tree? A browser doesn’t speak HTML. The renderer process first needs to “translate” the HTML document to something a browser can understand.
That is the DOM tree.
Let’s take a look at an example.
<html><body>
   <h1>Hello world!</h1>
   <div>
       <p>
           It is a message from
           <span>the web</span>
       </p>
   </div>
</body></html>

The DOM tree of the example is shown in the image.
A DOM tree is a representation of HTML codes. We can visit it by entering the “document” in the Chrome console.
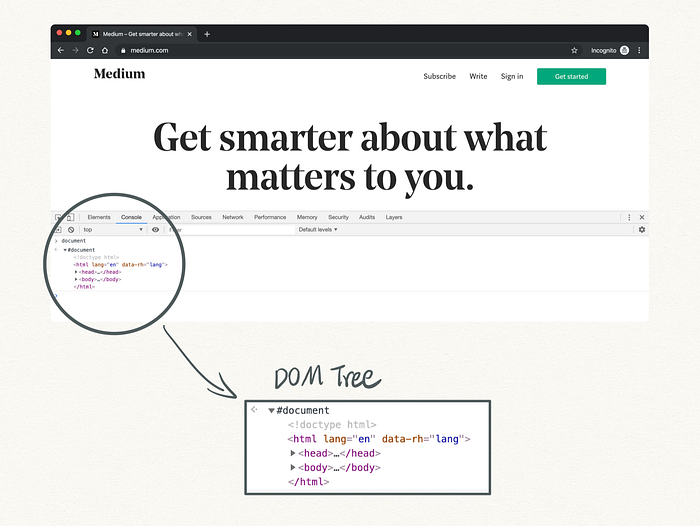
The DOM tree exists in memory. Therefore, JavaScript can visit and edit it.
Phase 2: Style computation
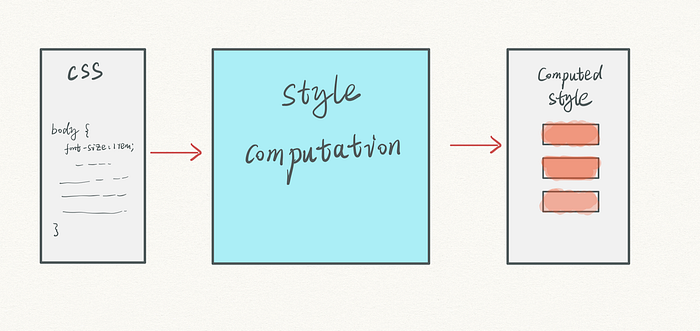
The input is CSS styles, and the output is a computed style structure.
It has three steps.
Step 1: “Translating” CSS
Similar to HTML, the browser doesn’t speak CSS. The translated result is style sheets.
Entering “document.styleSheets” in the Chrome browser console, we can see all parsed style sheets.
These style sheets come from
- a source linked in the <link> tag,
- styles inside of a <style>, and
- inline styles
Same as a DOM tree, the style sheets look like a JavaScript object structure and can be visited and edited in the memory.

Let’s take the Medium homepage as an example. It has 11 style sheets. The first one comes from a <link> tag, while the rest of them are styles inside of a <style> tag.
Step 2: standardizing values and unites
We use all kinds of values and units in our CSS.
- width: 50%
- padding: 2em 0
- font-size: 1rem
They are relative values.
At this step, all relative values are converted to the absolute ones, pixels.
Why pixels? At the end of the rendering phase, a browser displays bitmaps on the screen. Bitmaps are made of pixels.
It is time to do our math.
At the end of the standardization, the previous CSS values are changed to the following:
- width: 500px (Assuming the width of its parent element is 1000px.)
- padding: 32px 0 (Assuming the font size of the element is 16px.)
- font-size: 16px (Assuming the font size of the root element is 16px.)
Step 3: style computation

Finally, the renderer process calculates the computed styles and attaches them to each element.
Why computing style? CSS stands for Cascading Style Sheets. Cascading means that an element inherits some styles from its ancestors, and overrides parts of them with its own.
The renderer process computes all styles based on the cascading rules. Then it generates a list of final computed styles for each element.
For example, an element inherits the font-size: 16px from its ancestors. Itself has a font-size: 32px. The computed font-size style is font-size: 32px.
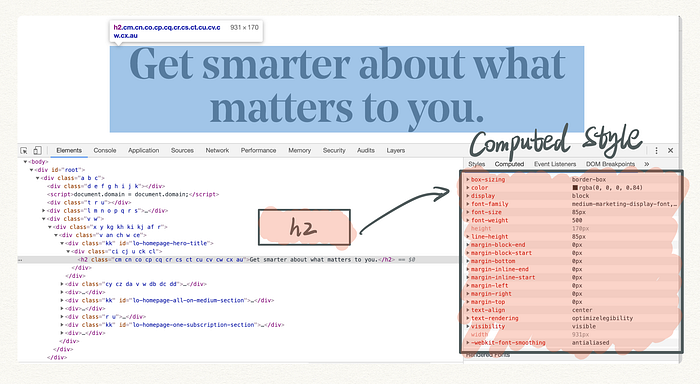
The image shows the computed style list for a h2 element on the Medium homepage.
After calculation completed, the final result is a list of computed styles. We can take a look at it in the Chrome console.
Phase 3: Layout
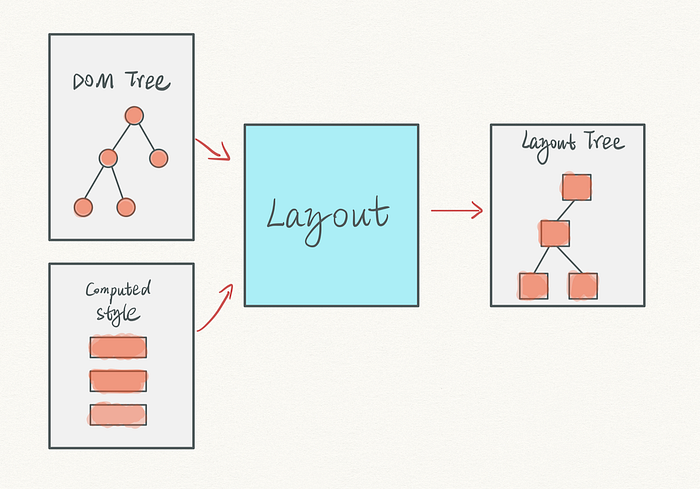
In this phase, the inputs are the DOM tree and computed styles. The output is a layout tree with computed layout information.
Step 1: constructing the layout tree
The layout tree looks like a duplication of the DOM tree.
What are the differences? First of all, “invisible” elements in the DOM tree won’t be included in the layout tree.
For example, an element with display: none is excluded from the layout tree. Same as all elements inside of the <header> tag. There is an exception: an element with visibility: hidden; is in the layout tree.
Secondly, some CSS properties add content to the layout.
Take a pseudo-class, for example, div::after {content: ‘I’m here’;} creates a content included in the layout tree though it is not existing in the DOM tree.
Step 2: calculating the geometry information
To paint a box on a blank canvas, we need to know:
- the starting x, y coordinates, and
- the size of the box
Each element in the layout tree is a box.
Calculating the final geometry of each element is a mighty job. Think about it. In CSS, many properties modify the geometry of an element.
- float: left;
- width: 100px;
- display: absolute;
- and more…
It is challenging to design an effective layout system to work with it. Developers on BlinkOn shared some knowledge with us if you are interested.
The main thread does the heavy lifting for us and completes all the calculations.
Now it has a layout tree. On the layout tree, each element has precise coordinates and size information.
Phase 4: Layer
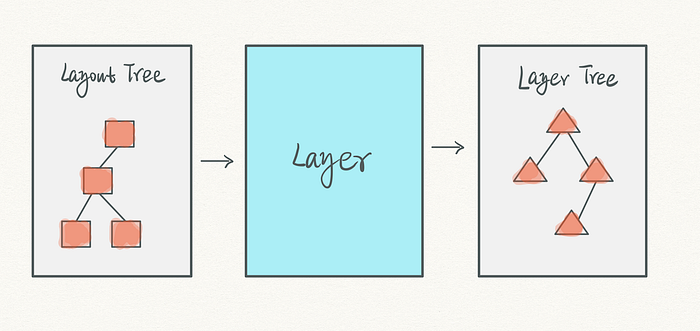
The input is the layout tree, and the output is a layer tree.
A layer three is about layers.
We all love the 3d transforming effect and convenient z-index property in CSS. They are all related to the layer.
If you ever use Photoshop or Sketch, you much be familiar with layers. The layer in a browser has the same concept.
Meanwhile, a layer tree is about the painting order. Why do we care about the painting order?
For example, you have two overlapping elements, element A and element B. A has a z-index: 9, which is more significant than B without a z-index property. A will be displayed at the top of B. The renderer process paints B on the canvas first, then paint A on top of it. This is a painting order.
The painting order is critical for the accurate display of your webpage.
How does a layer tree look like?
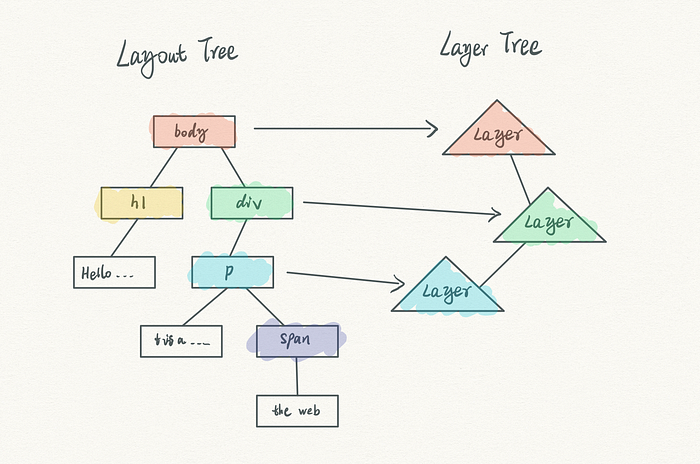
From the graphic, we can see not all elements have their own layer. Painting layers are expensive. For better performance, the renderer process only creates a layer when it is needed.
When is it needed? Two kinds of elements are considered by the renderer process.
Elements with stacking context
- z-index
- position: absolute
- transform
- will-change
The above are some CSS properties related to the stacking context. The renderer process creates a layer for the elements with any of these properties.
You can see a full list of the CSS properties affecting the layer tree on MDN document.
Chrome allows us to take a look at the layers on a webpage.
Clipped elements
A typical case of clipped elements is an overflowed text element.
Let’s say we have a 300px * 300px div. The long text in the div box overflows. When giving the box overflow: auto; We know the text becomes scrollable inside of the div.
When seeing the overflowed text element, the renderer process creates three layers.
- One for clipped texts, which visible in the 300px * 300px area.
- One for the full-text content so you can scrolling through them.
- One for scroll bar
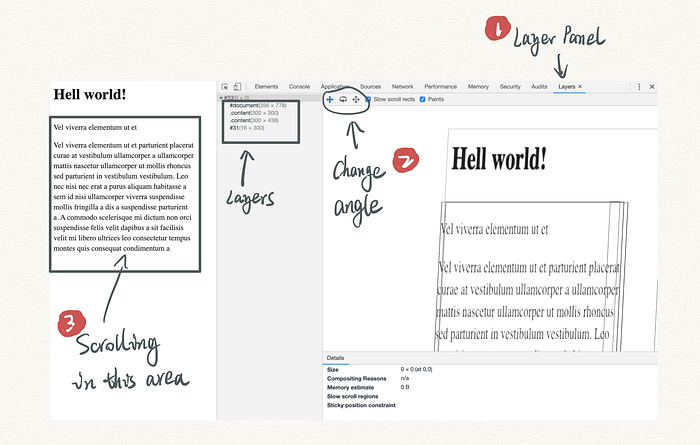
it is easier to understand this mechanism by viewing it in the console.
Run the following HTML in Chrome.
<html>
<body>    <h1>Hell world!</h1>    <div class=“box” style=“width: 300px; height: 300px; overflow: auto;”>        <p>Lorem ipsum vel viverra elementum ut et parturient placerat curae at vestibulum ullamcorper a ullamcorper mattis nascetur ullamcorper ut mollis rhoncus sed parturient in vestibulum vestibulum. Leo nec nisi nec erat a purus aliquam habitasse a sem id nisi ullamcorper viverra suspendisse mollis fringilla a dis a suspendisse parturient a. A commodo scelerisque mi dictum non orci suspendisse felis velit dapibus a sit facilisis velit mi libero ultrices leo consectetur tempus montes quis consequat condimentum a ullamcorper amet. Donec orci fames id consectetur nascetur parturient et magnis nunc lacinia aliquet nec dolor dictumst conubia a hac nibh consectetur habitant vel a cras.</p></div></body>
</html>
Open the layer panel and take a look. Layers are displayed in the layer panel. Try scrolling the text in the box, you will get the idea.
Finally, after all the computation, the renderer process has the layer tree on hand.
Phase 5: Paint
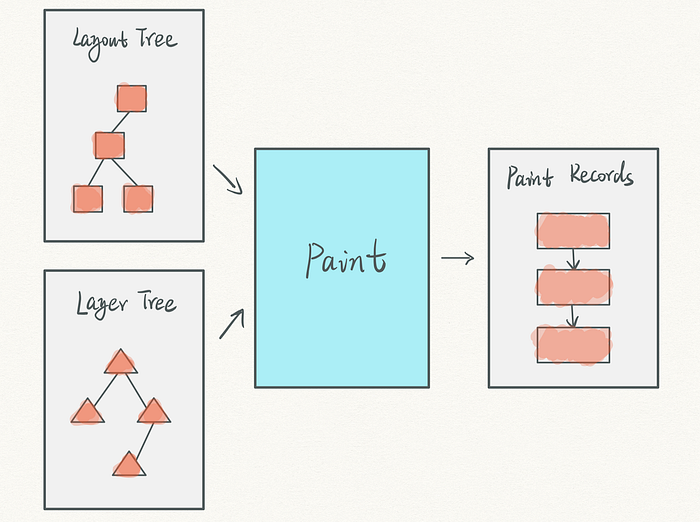
In this phase, the inputs are the layout tree and layer tree, and the output is paint records.
How does a paint record look like?
It has three parts:
- Action
- Position, including the coordinates (x, y) and the size (width, height).
- Styles
For example, a paint record looks like the following:
- Action: Draw Rect
- Pos: 0, 0, 300, 300
- backgroundColor: red
It is a paint record to draw a 300px * 300px red rectangular at (0, 0).
A paint record is like a note for the browser to execute the painting.
The paint records are a list of these notes in an order we confirmed in the layer tree, like “background first, then rectangle, then text”.
In the next step, the compositor thread carries over the work from the main thread, starts generating bitmaps based on the paint records.
Phase 6: Tilling

The input are the paint records and layers, and the output is tiles.
When tiling, the layers are separated into tiles, and the browser priorities the rendering based on the viewport position.
There are three keywords here: layer, tile, and viewport.
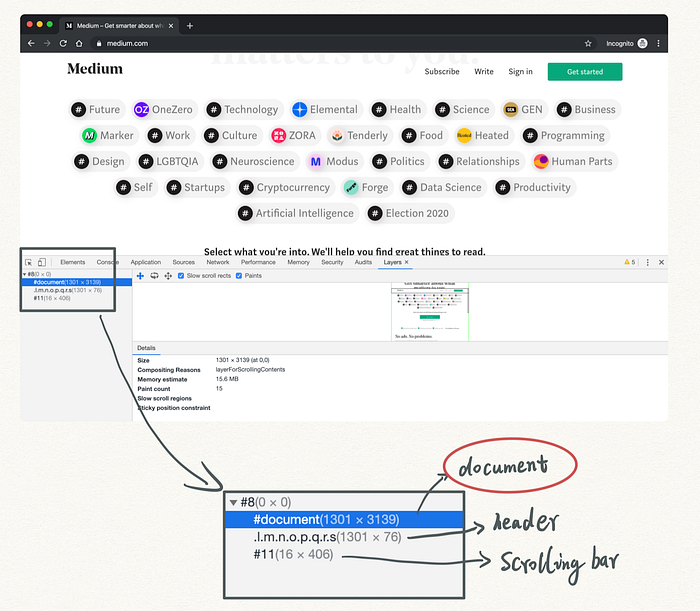
Let’s take a look at the Medium home page as an example. From Layer panel in DevTools, we can tell it has three layers:
- document
- header
- scroll bar
The “document” layer is separated into tiles. Usually, a tile size is 256px * 256px or 512px * 512px.
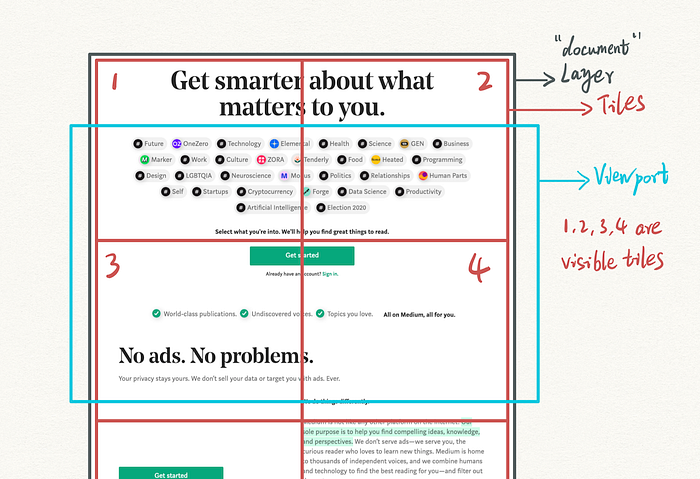
Rendering all tiles are expensive. The visible tiles, which are currently in the viewport, have the priority.
Phase 7: Raster
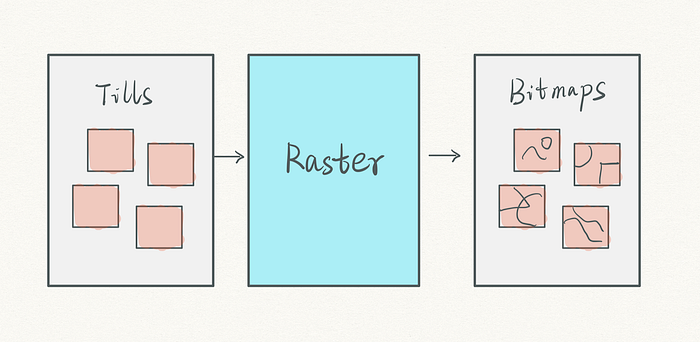
The input is tiles, and the output is bitmaps.
After knowing the tiles, the compositor thread creates a raster threads pool. Multiple raster threads carry on rastering tiles simultaneously.
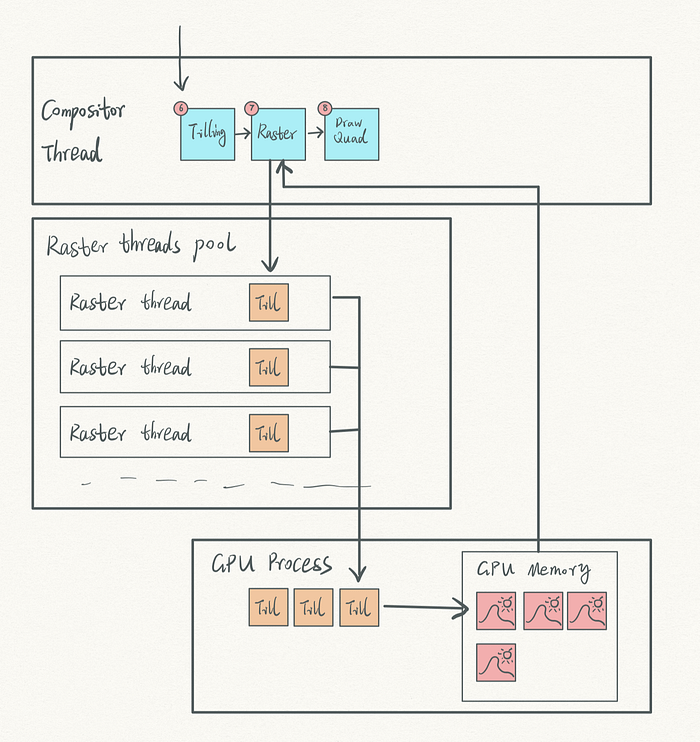
To accelerate the process, the raster threads send tiles to the GPU process through IPC. Then the GPU process generates bitmaps from tiles and saving bitmaps in GPU memory.
When the bitmaps are ready, GPU process delivers them back to the compositor thread in the render process for the next step.
Phase 8: Draw Quad and Display
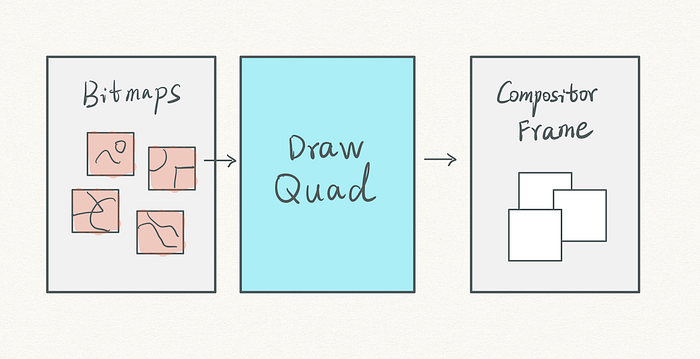
The input is bitmaps, and the output is a compositor frame.
When all needed tiles are processed, the compositor thread sends a command called Draw Quad to the browser process.
Inside of the browser process, a “viz” component receives the Draw Quad command, executes Display Compositor command, and “draws” a compositor frame into our computer memory.
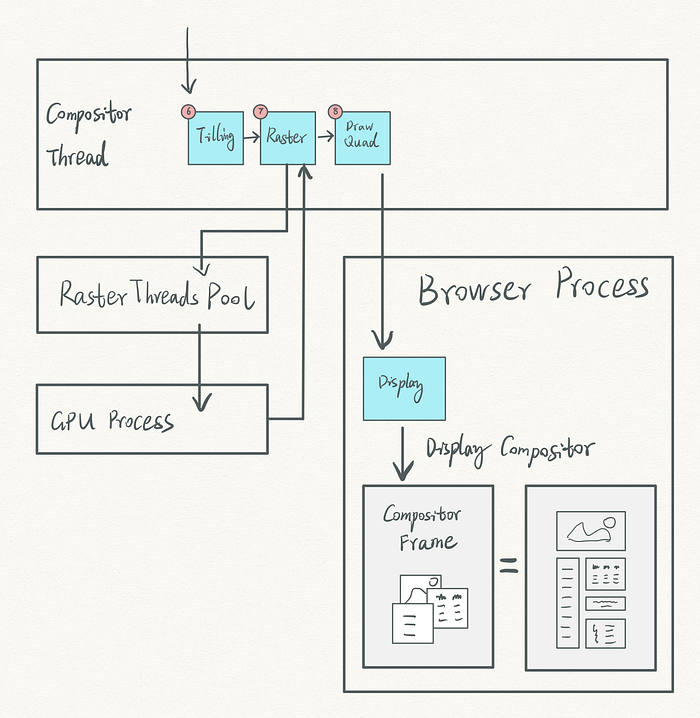
Finally, the browser process displays the compositor frame in the browser.
It is impressive that the entire 8 phases are happening within 1/60 second in a modern browser. That is 16.67 milliseconds.
What is the takeaway?
8 phases of rendering:
- The main thread in the renderer process “translates” the HTML document to DOM tree
- It conveys CSS into the computed style
- It creates a layout tree based on the DOM tree and computed style
- From a layout tree, it generates a layer tree
- Lastly, it establishes paint records
- The compositor thread carries over the paint records, starts tilling based on the current viewport
- Multiple raster threads raster tiles into bitmaps with the help of the GPU process.
- The browser process receives the Draw Quad command from the browser process, then it displays a frame of the page in front of us.
Up next…
Render tree is not relevant in 2019
If you heard of render tree, it is not relevant anymore in 2019. A similar concept here is the layer tree.